How to Take a Screenshot on Windows: The Ultimate Guide (2024)
Capturing screenshots on Windows is an essential skill for personal and professional use. Whether you’re saving an important document, sharing an error message, or creating tutorials, Windows offers various easy-to-use tools for taking screenshots. In this guide, we’ll explore the most effective methods while incorporating high-searched keywords like “how to screenshot on Windows 11” and “best screenshot tools for Windows.”
Contents
- 1 1. Using the Print Screen Key (PrtScn)
- 2 2. Windows + Print Screen for Auto-Saving
- 3 3. Snip & Sketch Tool (Windows + Shift + S)
- 4 4. Snipping Tool
- 5 5. Game Bar for Gamers (Windows + G)
- 6 6. Third-Party Tools for Professional Screenshots
- 7 7. Chrome Extensions for Web Captures
- 8 Tips for Optimizing Your Screenshots
- 9 Conclusion
1. Using the Print Screen Key (PrtScn)
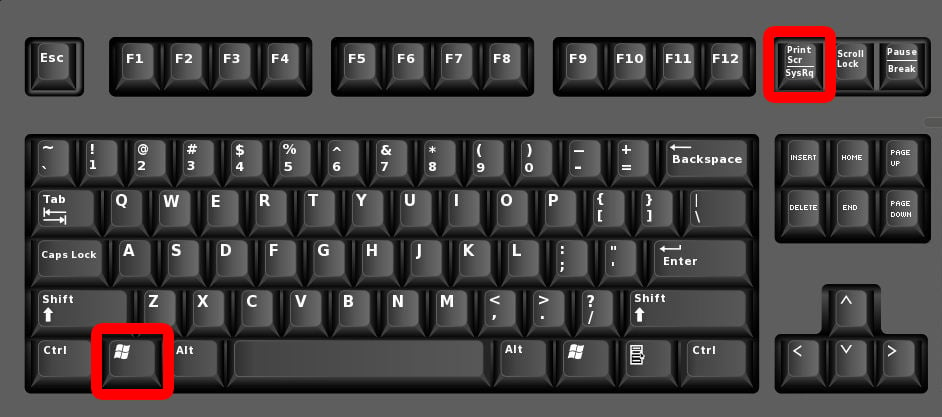
The Print Screen key is the most searched and widely used method for taking screenshots on Windows:Full-Screen Screenshot:Press the PrtScn key. This copies the entire screen to your clipboard, and you can paste it into applications like Paint or Word with Ctrl + V.
Active Window Screenshot:
Press Alt + PrtScn to capture only the active window. This method is great for focused captures.
2. Windows + Print Screen for Auto-Saving
Users frequently search for “how to save screenshots automatically on Windows.” This shortcut is the answer:
Press Windows + PrtScn
Your screenshot is automatically saved in the Screenshots folder under the Pictures directory.
3. Snip & Sketch Tool (Windows + Shift + S)
“How to use Snip & Sketch” is a trending query among Windows users. This tool is great for selective captures and quick edits:
Press Windows + Shift + S.
Choose your capture mode: Rectangular, Freeform, Window, or Full-screen.
The captured image is copied to the clipboard for editing or saving.
4. Snipping Tool
Searches for “how to use Snipping Tool in Windows 10 and 11” are consistently popular. The tool remains a favorite for detailed screenshots:
Open Snipping Tool from the Start menu.
Choose between Freeform, Rectangular, Window, or Full-screen Snips.
Save the image or annotate it directly.
5. Game Bar for Gamers (Windows + G)
If you’re a gamer, “how to screenshot games on Windows” might be your go-to search. The Game Bar offers an efficient solution:
Press Windows + G to open the Game Bar.
Click the camera icon or use Windows + Alt + PrtScn to capture your screen during gameplay.
6. Third-Party Tools for Professional Screenshots
Searches for “best screenshot tools for Windows” show growing interest in advanced tools. Here are the top options:
Lightshot: A lightweight tool that enables quick annotations and sharing.
ShareX: Ideal for power users, with features like screen recording and GIF creation.
Snagit: A premium tool with professional-grade editing options.
7. Chrome Extensions for Web Captures
For capturing full webpages, “how to screenshot entire webpage in Chrome” is a common query. Extensions like Nimbus Capture and Awesome Screenshot make it easy to grab entire websites.
Tips for Optimizing Your Screenshots
Use high-resolution settings for clarity when sharing or printing.
Annotate your screenshots with tools like Snip & Sketch or Lightshot.
Save in appropriate formats: PNG for high quality, JPEG for smaller file sizes.
Conclusion
Knowing how to take a screenshot on Windows is a skill that saves time and enhances productivity. Whether you’re searching for “how to screenshot on Windows 11,” “Snip & Sketch tutorial,” or “best free screenshot tools,” this guide covers all the trending and efficient methods.
Stay updated with the latest tools and shortcuts to make your Windows experience seamless and efficient!
May U Like:
Affiliate Marketing with Amazon: A Comprehensive Guide 2024
Share this content:







Post Comment